


Terraform reusable infrastructure, separation of environments and provider's authentication for DevOps Engineers.
Days 5 and 6 of #TerraWeek


Table of contents
- 📝Introduction
- 📝Terraform Modules
- 📝Monolithic Terraform Configuration in modular repos
- 📝Create and apply a Monolith configuration
- 📝Separating configuration files
- 📝Separating state
- 📝Deploy environments using separate directories and workspaces
- 📝State storage in workspaces
- 📝Destroy your workspace deployments
- 📝Terraform Providers
- 📝Terraform AWS credentials authentication
- AWS Credentials(ACCESS_KEY, SECRET_KEY) inside terraform file
- Credentials file along with shared_credentials_file settings
- Store AWS Credentials on a management system, like HashiCorp Vault or AWS Secrets Manager.
📝Introduction
Today, in this blog post, we will cover the basic concepts of restructure a Monolithic Terraform configuration that managed multiple environments, separating those environments by creating different Directories or Workspaces, and state files for each. Also, we will cover the basics of Providers and some Authentication methods.
This is part of #Day 5 and 6 of the #TerraWeek challenge initiated by Shubham Londhe.
📝Terraform Modules
It allows for encapsulating Reusable Infrastructure Configurations into a modular and scalable format.
They enable you to organize your codebase, promote code reuse, and abstract away complexities. Modules act as self-contained components that represent a set of resources and their associated configurations.
Advantages of using Modules in Terraform:
Reusability: Modules allow you to define and configure infrastructure resources once and reuse them across different projects or environments. This eliminates the need to rewrite or duplicate code, saving time and effort.
Abstraction: Modules abstract away the implementation details, enabling you to focus on the higher-level aspects of your infrastructure. They provide a simplified interface for consuming the module, hiding the underlying complexity.
Scalability: By encapsulating infrastructure configurations into modules, you can easily scale your deployments without sacrificing maintainability. Modules can be reused and composed to create complex infrastructures.
Standardization: Modules promote consistency by enforcing best practices, naming conventions, and configuration standards across deployments. They provide a standardized way to provision resources, ensuring uniformity and reducing the chance of errors.
Collaboration: Modules facilitate collaboration by providing a clear separation of concerns, allowing multiple teams to work concurrently on different modules. Teams can develop and maintain modules independently, promoting modular development and reducing dependencies.
📝Monolithic Terraform Configuration in modular repos
By default, Terraform configuration is to keep all in a Monolithic repo.
However, this tool as an IaC can offer the possibility to break down it into multiple environments, for example, creating a workspace for each environment and switching between them using the terraform workspace command. This allows us to maintain separate states for each environment and makes it easier and safer to manage multiple environments.
So, in this way, if we need to make a change to part of our Infrastructure, we just change the module configs that we are working on, instead of having to worry about changing the whole Monolithic repo.
Using Modules repos we can version our code. We can have a specific code Module for Production, whereas Dev and Staging could be using different code Modules versions depending on what level of testing we have done and how ready that code is for production.
In the example below, we will cover all 4 Tasks proposed on Day 5 of this #TerraWeek challenge.
We will provision two instances of a web application hosted in an S3 bucket that represents production and development environments. The configuration you use to deploy the application will start as a Monolith. You will modify it to step through the common phases of evolution for a Terraform project until each environment has its own independent configuration and state using Modules repos.
📝Create and apply a Monolith configuration
In your terminal, clone the example repository. It contains the configuration used in this blog post.
$ git clone https://github.com/fjblsouza/learn-terraform-code-organization.git
Navigate to the directory.
$ cd /learn-terraform-code-organization
Your root directory contains four files and an "assets" folder. The root directory files compose the configuration as well as the inputs and outputs of your deployment.
main.tf- configures the resources that make up your infrastructure.variables.tf- declares input variables for yourdevandprodenvironment prefixes, and the AWS region to deploy to.terraform.tfvars.example- defines your region and environment prefixes.outputs.tf- specifies the website endpoints for yourdevandprodbuckets.assets- houses your webapp HTML file.
In your text editor, open the main.tf file. The file consists of a few different resources:
The
random_petresource creates a string to be used as part of the unique name of your S3 bucket.Two
aws_s3_bucketresources designatedprodanddev, which each create an S3 bucket. Notice that thebucketargument defines the S3 bucket name by interpolating the environment prefix and therandom_petresource name.Two
aws_s3_bucket_aclresources designatedprodanddev, which set apublic-readACL for your buckets.Two
aws_s3_bucket_website_configurationresources designatedprodanddev, which configure your buckets to host websites.Two
aws_s3_bucket_policyresources designatedprodanddev, which allow anyone to read the objects in the corresponding bucket.Two
aws_s3_objectresources designatedprodanddev, which load the file in the localassetsdirectory using the built-infile()function and upload it to your S3 buckets.
Terraform requires unique identifiers - in this case prod or dev for each s3 resource - to create separate resources of the same type.
Open the terraform.tfvars.example file in your repository and edit it with your own variable definitions. Change the region to your nearest location in your text editor.
region      = "eu-west-3"
prod_prefix = "prod"
dev_prefix  = "dev"
Save your changes in your editor and rename the file to terraform.tfvars. Terraform automatically loads variable values from any files that end in .tfvars.
$ mv terraform.tfvars.example terraform.tfvars
In your terminal, initialize your Terraform project and then, apply the configuration.
$ terraform init
$ terraform init
$ terraform apply
P.S. - Deactivate the Block Public Access on the Buckets that have already been created(temporarily on this hands-on)

Execute again the command terraform apply to complete the implementation properly.
Navigate to the web address from the Terraform output to display the deployment in a browser. Your directory now contains a state file, terraform.tfstate.


📝Separating configuration files
Defining multiple environments in the same main.tf file may become hard to manage as you add more resources. HCL supports using multiple configuration files to help organize our infrastructure.
Let's go to organize our current configuration by separating the configurations into two separate files — one root module for each environment. To split the configuration, first, make a copy of main.tf and name it dev.tf.
$ cp main.tf dev.tf
Rename the main.tf file to prod.tf.
$ mv main.tf prod.tf
You now have two identical files. Open dev.tf and remove any references to the production environment by deleting the resource blocks with the prod ID. Repeat the process for prod.tf by removing any resource blocks with the dev ID.
Your directory structure will look similar to the one below.

Although your resources are organized in environment-specific files, your variables.tf and terraform.tfvars files contain the variable declarations and definitions for both environments.
Terraform loads all configuration files within a directory and appends them together, so any resources or providers with the same name in the same directory will cause a validation error. If you were to run only for checking the result the terraform plan command now, your random_pet resource and provider block would cause errors since they are duplicated across the two files.

Destroy your resources before moving on. Respond to the confirmation prompt with a yes.
P.S.- Before trying to destroy, you only need to edit the prod.tf file by commenting on the first line ofterraform block until the last line of resource block in prod.tf file. No need to do the same on dev.tf. You can comment on the configuration by adding a /* at the beginning of the commented-out block and a */ at the end, as shown below.


Then after destroying it, you can remove the comments from prod.tf.
$ terraform destroy

📝Separating state
The previous operation destroyed both the development and production environment resources. When working with Monolithic configuration, you can use the terraform apply command with the -target flag to scope the resources to operate on, but that approach can be risky and is not a sustainable way to manage distinct environments. For safer operations, you need to separate your development and production state.
There are two primary methods to separate state between environments: directories and workspaces. We will cover both of them.
To separate environments with potential configuration differences, use a directory structure. Use workspaces for environments that do not greatly deviate from one another, to avoid duplicating your configurations.
Let's try both methods below to understand which will serve our infrastructure best.
- SEPARATE DIRECTORIES
By creating separate directories for each environment, Terraform stores your state files on disk in their corresponding configuration directories. Terraform operates only on the state and configuration in the working directory by default.
Directory-separated environments rely on duplicate Terraform code. This may be useful if you want to test changes in a development environment before promoting them to production. However, the directory structure runs the risk of creating drift between the environments over time. If you want to reconfigure a project with a single state file into directory-separated states, you must perform advanced state operations to move the resources.
After reorganizing your environments into directories, your file structure should look like the one below:

Create prod and dev directories
Create directories named prod and dev.
$ mkdir prod && mkdir dev
Move the dev.tf file to the dev directory, and rename it to main.tf.
$ mv dev.tf dev/main.tf
Copy the variables.tf, terraform.tfvars, and outputs.tf files to the dev directory
$ cp outputs.tf terraform.tfvars variables.tf dev/
Your environment directories are now one step removed from the assets folder where your web app lives. Open the dev/main.tf file in your text editor and edit the file to reflect this change by editing the file path in the content argument of the aws_s3_object resource with a /.. before the assets subdirectory.
resource "aws_s3_object" "dev" {
  key          = "index.html"
  bucket       = aws_s3_bucket.dev.id
-  content      = file("${path.module}/assets/index.html")
+  content      = file("${path.module}/../assets/index.html")
  content_type = "text/html"
}

You will need to remove all the references to the prod environment from your dev configuration files and vice-versa.
First, open dev/outputs.tf in your text editor and remove the reference to the prod environment.
-output "prod_website_endpoint" {
-  value = "http://${aws_s3_bucket_website_configuration.prod.website_endpoint}/index.html"
-}

Next, open dev/variables.tf and remove the reference to the prod environment.
-variable "prod_prefix" {
-  description = "This is the environment where your webapp is deployed. qa, prod, or dev"
-}

Finally, open dev/terraform.tfvars and remove the reference to the prod environment.
 region      = "eu-west-3"
-prod_prefix = "prod"
 dev_prefix  = "dev"

Repeat the steps you took in the dev directory, and uncomment out the random_pet and provider blocks in main.tf.
Rename prod.tf to main.tf and move it to your production directory.
$ mv prod.tf prod/main.tf
Move the variables.tf, terraform.tfvars, and outputs.tf files to the prod directory.
$ mv outputs.tf terraform.tfvars variables.tf prod/
Repeat the steps you took in the dev directory on prod directory.
First, open prod/main.tf and edit it to reflect the new directory structure by adding /.. to the file path in the content argument of the aws_s3_object, before the assets subdirectory.

Next, remove the references to the dev environment from prod/variables.tf, prod/outputs.tf, and prod/terraform.tfvars.


Finally, uncomment the prod/main.tf.
📝Deploy environments using separate directories and workspaces
To deploy, change directories in your dev environment.
$ cd dev
This directory is new to Terraform, so you must initialize it.
$ terraform init
Run the apply for the dev environment and enter yes when prompted to accept the changes.
$ terraform apply
P.S. - Deactivate the Block Public Access on the Buckets that have already been created(temporarily on this hands-on)

Execute again the command terraform apply to complete the implementation properly.
You now have only one output from this deployment. Check your website endpoint in a browser.

Repeat these steps for your production environment.
$ cd ../prod
This directory is new to Terraform, so you must initialize it first.
$ terraform init
Run the apply for your prod environment and enter yes when prompted to accept the changes. Check your website endpoint in a browser.
You now have only one output from this deployment. Check your website endpoint in a browser.
$ terraform apply
P.S. - Deactivate the Block Public Access on the Buckets that have already been created(temporarily on this hands-on)
Execute again the command terraform apply to complete the implementation properly.

Now your dev and prod environments are in separate directories, each with its own configuration files and state.
Before we move on to the second approach to environment separation, using Workspaces, let's destroy both the dev and prod resources.
$ terraform destroy
- SEPARATE WORKSPACES
Workspace-separated environments use the same Terraform code but have different state files, which is useful if you want your environments to stay as similar to each other as possible, for example, if you are providing dev infrastructure to a team that wants to simulate running in prod.
However, you must manage your workspaces in the CLI and be aware of the workspace you are working in to avoid accidentally performing operations in the wrong environment.
All Terraform configurations start out in the default workspace. Type terraform workspace list to have Terraform print out the list of your workspaces with the currently selected one denoted by a *.
$ terraform workspace list

First of all, let's update our Terraform directory. Copy the main.tf, output.tf, terraform.tfvars and variable.tf, files from dev to your root directory before removing all the files from dev and prod directories.
After copying them, remove both previous directories created on the Separate Directories steps from your root directory.
$ rm -rf dev/ prod/

Update your variable input file to remove references to the individual environments.
In your text editor, open variables.tf and remove the environment references.
 variable "region" {
   description = "This is the cloud hosting region where your webapp will be deployed."
 }

-variable "dev_prefix" {
+variable "prefix" {
   description = "This is the environment where your webapp is deployed. qa, prod, or dev"
 }

-variable "prod_prefix" {
-  description = "This is the environment where your webapp is deployed. qa, prod, or dev"
-}

$ mv dev.tf main.tf
Open this file in your text editor and replace the dev resource IDs and variables with the function of the resource itself. You are creating a generic configuration file that can apply to multiple environments.
-resource "aws_s3_bucket" "dev" {
+resource "aws_s3_bucket" "bucket" {
-  bucket = "${var.dev_prefix}-${random_pet.petname.id}"
+  bucket = "${var.prefix}-${random_pet.petname.id}"

   force_destroy = true
 }

-resource "aws_s3_bucket_website_configuration" "dev" {
+resource "aws_s3_bucket_website_configuration" "bucket" {
-  bucket = aws_s3_bucket.dev.id
+  bucket = aws_s3_bucket.bucket.id

   index_document {
     suffix = "index.html"
   }

   error_document {
     key = "error.html"
   }
 }

- resource "aws_s3_bucket_policy" "dev" {
+ resource "aws_s3_bucket_policy" "bucket" {
-   bucket = aws_s3_bucket.dev.id
+   bucket = aws_s3_bucket.bucket.id

   policy = <<EOF
 {
     "Version": "2012-10-17",
     "Statement": [
         {
             "Sid": "PublicReadGetObject",
             "Effect": "Allow",
             "Principal": "*",
             "Action": [
                 "s3:GetObject"
             ],
             "Resource": [
-                "arn:aws:s3:::${aws_s3_bucket.dev.id}/*"
+                "arn:aws:s3:::${aws_s3_bucket.bucket.id}/*"
             ]
         }
     ]
 }
 EOF
 }

-resource "aws_s3_object" "dev" {
+resource "aws_s3_object" "webapp" {
   acl          = "public-read"
   key          = "index.html"
-  bucket       = aws_s3_bucket.dev.id
+  bucket       = aws_s3_bucket.bucket.id
   content      = file("${path.module}/assets/index.html")
   content_type = "text/html"
 }


Using workspaces organizes the resources in your state file by environments, so you only need one output value definition. Open your outputs.tf file in your text editor and remove the dev environment reference in the output name. Change dev in the value to bucket.
output "website_endpoint" {
  value = "http://${aws_s3_bucket_website_configuration.bucket.website_endpoint}/index.html"
}
Finally, replace terraform.tfvars with a prod.tfvars file and a dev.tfvars file to define your variables for each environment.
For your dev workspace, copy the terraform.tfvars file to a new dev.tfvars file.
$ cp terraform.tfvars dev.tfvars
Edit the variable definitions in your text editor. For your dev workspace, the prefix value should be dev.
region = "eu-west-3"
prefix = "dev"

Create a new .tfvars file for your production environment variables by renaming the terraform.tfvars file to prod.tfvars.
$ mv terraform.tfvars prod.tfvars
Update prod.tfvars with your prod prefix.
region = "eu-west-3"
prefix = "prod"

Now that you have a single main.tf file, initialize your directory to ensure your Terraform configuration is valid.
$ terraform init
Create a dev workspace
Create a new workspace in the Terraform CLI with the workspace command.
$ terraform workspace new dev
Terraform's output will confirm you created and switched to the workspace.

Any previous state files from your default workspace are hidden from your dev workspace, but your directory and file structure do not change. Check which workspace you are working on now.
$ terraform workspace list

Initialize the directory.
$ terraform init
Apply the configuration for your development environment in the new workspace, specifying the dev.tfvars file with the -var-file flag.
$ terraform apply -var-file="dev.tfvars"
Terraform will create three resources and prompt you to confirm that you want to perform these actions in the workspace dev and Enter yes.
## ...

Do you want to perform these actions in workspace "dev"?
  Terraform will perform the actions described above.
  Only 'yes' will be accepted to approve.

  Enter a value:

  ## ...
P.S. - Deactivate the Block Public Access on the Buckets that have already been created(temporarily on this hands-on)
Execute again the command terraform apply -var-file="dev.tfvars" to complete the implementation properly and check your website endpoint in a browser.


Create a prod workspace
Create a new production workspace.
$ terraform workspace new prod
Terraform's output will confirm you created the workspace and are operating within that workspace.

Any previous state files from your dev workspace are hidden from your prod workspace, but your directory and file structure do not change.

You have a specific prod.tfvars file for your new workspace. Run terraform apply with the -var-file flag and reference the file. Enter yes when you are prompted to accept the changes and check your website endpoint in a browser.
$ terraform apply -var-file="prod.tfvars"
P.S. - Deactivate the Block Public Access on the Buckets that have already been created(temporarily on this hands-on)
Execute again the command terraform apply -var-file="prod.tfvars" to complete the implementation properly and check your website endpoint in a browser.
Your output now contains only resources labelled prod and your single website endpoint is prefixed with prod.
P.S. - Working with Workspaces was required to change the name of my key pair on the main.tf file since not possible to use the same name and you will receive an error message informing "Error: importing EC2 Key Pair (test-key): InvalidKeyPair.Duplicate: The keypair already exists"


📝State storage in workspaces
When you use the default workspace with the local backend, your terraform.tfstate file is stored in the root directory of your Terraform project. When you add additional workspaces your state location changes; Terraform internals manage and store state files in the directory terraform.tfstate.d.
Your directory will look similar to the one below.

📝Destroy your workspace deployments
To destroy your infrastructure in a multiple workspace deployment, you must select the intended workspace and run terraform destroy -var-file= with the .tfvars file that corresponds to your workspace.
Destroy the infrastructure in your prod workspace, specifying the prod.tfvars file with the -var-file flag.
$ terraform destroy -var-file="prod.tfvars"

When you are sure you are running your destroy command in the correct workspace, enter yes to confirm the destroy plan.
Next, to destroy your dev infrastructure, switch to your dev workspace using the select subcommand.
$ terraform workspace select dev

Run terraform destroy specifying dev.tfvars with the -var-file flag.
$ terraform destroy -var-file="dev.tfvars"

📝Terraform Providers
Terraform is one of the most popular tools used by DevOps teams to automate infrastructure tasks. It is used to provision and manages any cloud, infrastructure, or service.
Most of Terraform users provision their infrastructure on the major cloud providers such as AWS, Azure, OCI, and others. To know more about various other terraform providers check here.
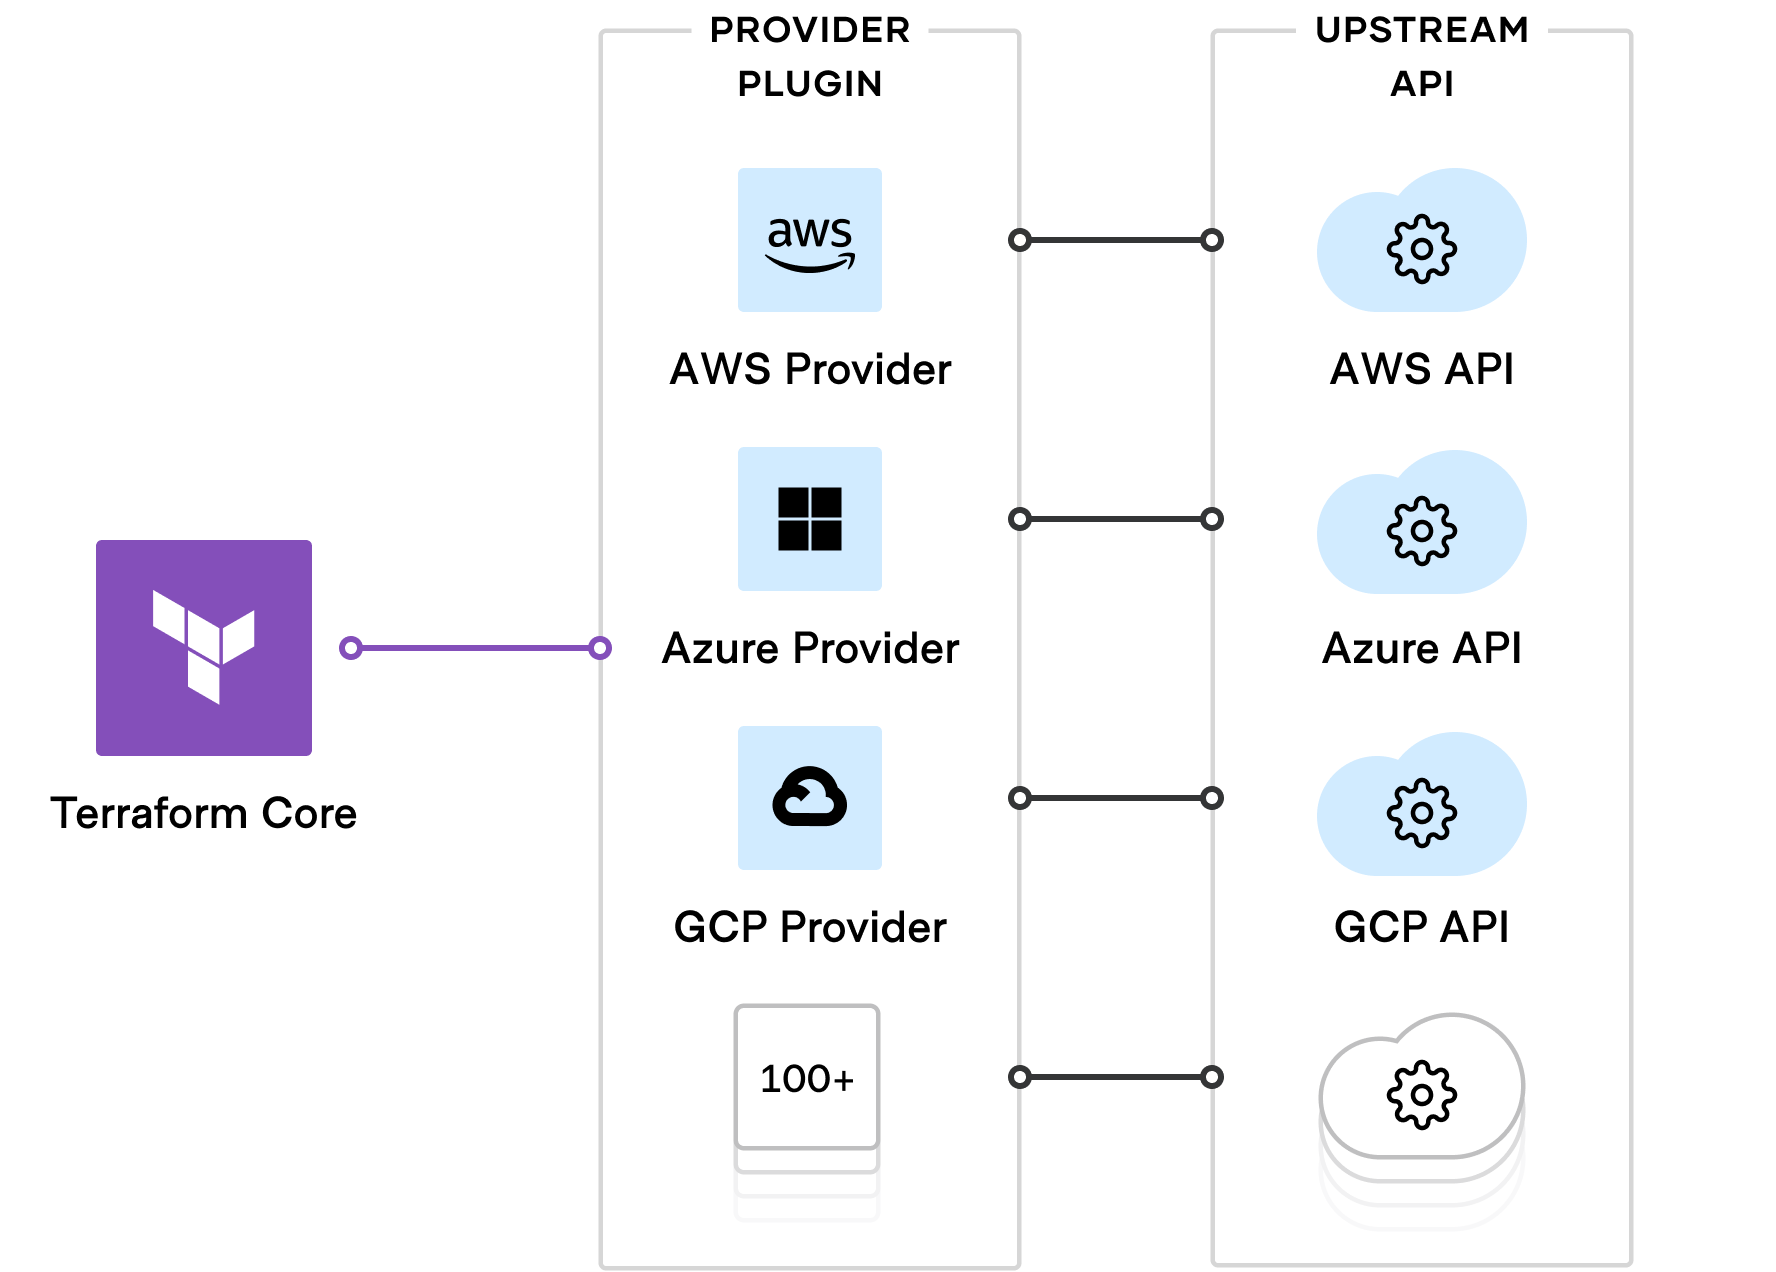
- Providers are the plugins that Terraform uses to manage those resources. Every supported service or infrastructure platform has a provider that defines which resources are available and performs API calls to manage those resources.
Let's talk about AWS Terraform Provider because of the following:
The two most popular options for deploying infrastructure to AWS are CloudFormation, a service native to AWS, and Terraform, an open-source offering from HashiCorp. Most of the AWS resources can be provisioned with Terraform as well and is often faster than CloudFormation when it comes to supporting new AWS features. On top of that, Terraform supports other cloud providers as well as 3rd party services.
Here’s an example of how to configure the AWS provider in Terraform using code:

📝Terraform AWS credentials authentication
If you are new to Terraform or maybe you have been using Terraform for quite some time then might have felt the need to manage your AWS Credentials inside your Terraform file.
So, we will go through the different ways to set up your AWS Credentials so that you do not have to re-configure the AWS Credentials every time, also we will pay attention what are the most secure way to handle and store your AWS Credentials.
If you do not store those credentials securely then you might compromise the security of your infrastructure by exposing AWS Root Account credentials. So it is always recommended to follow good security practices for handling the credentials
AWS Credentials(ACCESS_KEY, SECRET_KEY) inside terraform file
- (*Not recommended)
The easiest way to use the AWS credentials is to hard code the AWS's access_key and secret_key inside your terraform file.
i.e.
provider "aws" {
   profile    = "test"
   region     = "eu-west-3"
   access_key = "A0LPA99DFKJ74HW0CPAGH0FNM3"
   secret_key = "a1toUHEBHSU49348JjdssNicCwcT61DfzHtHtkWJYhgnN"
}
Problems with the above choice
AWS Credentials are stored in plain text format
If you are using version control(GitHub, BitBucket, etc..) then your AWS credentials might end up in a public code repository where anyone can use those credentials and can impose a great risk to your cloud infrastructure.
Hard-coding credentials in one place make it hard to re-use those credentials in other terraform projects or other terraform modules. So if you are planning to create another terraform project using the same credentials then you can not re-use the same piece of code.
When to Hard Code AWS Credentials
If you are doing some development work and your terraform code is only accessible within your local development environment.
Doing some POC(Proof of Concept) tasks with Terraform limiting it only to the local development environment.
Credentials file along with shared_credentials_file settings
In this option, we are storing the AWS Credentials inside /.aws/credentials file.
You need to install aws cli before you start storing those credentials inside /.aws/credentials. Refer to this aws cli installation guide so that you have /.aws/credentials created onto your machine.
After installing the aws cli you will have file credentials present at /.aws/credetials
Sharing the credentials.
i.e.
provider "aws" {
   profile    = "test"
   region     = "eu-west-3"
   shared_credentials_file = "/home/ubuntu/.aws/credentials"
}
Pros of shared_credentials_file
You can re-use the AWS Credentials with other terraform projects or terraform modules
You do not need to repeat or hard code AWS Credentials everywhere
AWS credentials are stored at the machine level, so they will not end up in the public code repository
If you limit the access of /.aws/credentials to root user then you have improved the security over the credentials sharing
Cons
- If you do not set permission over the /.aws/credentials file then anyone with access to the machine can view the AWS credentials.
Store AWS Credentials on a management system, like HashiCorp Vault or AWS Secrets Manager.
These tools offer a secure way to store and manage secrets, providing access control, encryption, and audit logs. The best place to start is by creating a Hashicorp Vault Secrets Engine.
i.e.
resource "vault_mount" "secret" {
 path = "secret"
 type = "test"
}
resource "vault_generic_secret" "aws_credentials" {
 path = "secret/aws/credentials"
 data_json = <<JSON  {
  "access_key": "${var.aws_access_key}",
  "secret_key": "${var.aws_secret_key}"
 }  JSON
}
The above code creates a "test" secrets engine mount and a generic secret that stores AWS credentials.
Replace var.aws_access_key and var.aws_secret_key with the corresponding environment variables, or use a different method to securely pass these values to Terraform. Once you have a secrets engine configured, we can securely retrieve those AWS credentials from Hashicorp Vault via the below policy:
data "vault_generic_secret" "aws_credentials" {
 path = "secret/aws/credentials"
}
provider "aws" {
 access_key = data.vault_generic_secret.aws_credentials.data.access_key
 secret_key = data.vault_generic_secret.aws_credentials.data.secret_key
 region     = "eu-west-3"
}
The above code retrieves your AWS credentials from HashiCorp Vault and sets them as a provider configuration for the ‘aws’ provider. Now, you can use Terraform to configure AWS resources without hardcoding or storing the AWS credentials in plaintext.
P.S. - This is just an example. You should modify it based on your specific requirements and the credential management system you are using. Additionally, you should configure access control and audit logs for your credential management system to ensure that secrets are protected and monitored.
In this blog post, you learned how to restructure a Monolithic Terraform configuration that managed multiple environments. You separated those environments by creating different Directories or Workspaces, and state files for each. Also, we covered a quick overview of Providers and some authentication methods.
Thank you for reading. I hope you were able to understand and learn something helpful from my blog.
Please follow me on Hashnode and on LinkedIn franciscojblsouza