

OpenShift Hands-On Lab - Working with Image Registries, Tagging and Saving an Image using Podman
OpenShift Learning Path for Cloud and DevOps Engineers


Table of contents
- 📝Introduction
- 📝Log in to the AWS Management Console
- 📝Configure New Local Registries
- 📝Configure the Insecure Registry
- 📝Pull a Custom Image to the System
- 📝Modify the Existing Containers Default Web Page
- 📝Commit the Changes to a New Image and Tag the Image
- 📝Create a .tar Archive of the New Image
- 📝Publish the New Image to a Local Registry
📝Introduction
In this lab, we will configure Podman to use 2 new registries running on the local system. In addition to this, a custom version of an image will be searched for and pulled to the local system. Also, we will explore podman image tagging, modifying a container, saving an image, and pushing an image to a repository.
These are the objectives of this lab:
Configure New Local Registries
Configure the Insecure Registry
Pull a Custom Image to the System
Modify the Existing Containers Default Web Page
Commit the Changes to a New Image and Tag the Image
Create a .tar Archive of the New Image
Publish the New Image to a Local Registry
📝Log in to the AWS Management Console
Using your credentials, make sure you're using the right Region. In my case, I am using AWS as my cloud provider and chose us-east-1. However, for this hands-on lab, you can select any cloud provider to create your Linux server VMs (I am using a Red Hat Enterprise Linux 8.7 distro) and Podman 3.0.1 (Link to how to install Podman)
📌Note: You must create the AWS Access Key and AWS Secret Access Key and configure the AWS CLI in the terminal to use it.
You can use link1 and link2 for it.
📝Configure New Local Registries
Use superuser privilege to edit the file:
sudo vim /etc/containers/registries.confScroll down to the
registries.searchsection.Within the brackets next to
registries =, type'localhost:5000'and'localhost:5001'separated by a comma (Remember to pushito enter insert mode).

📝Configure the Insecure Registry
Scroll down to the
registries.insecuresection.Within the brackets next to
registries =, type'localhost:5001'.Save and quit the file by pressing Escape followed by
:wq.
📌Note: When copying and pasting code into Vim from the lab guide, first enter
:set paste(and thenito enter insert mode) to avoid adding unnecessary spaces and hashes. To save and quit the file, press Escape followed by:wq. To exit the file without saving, press Escape followed by:q!.Log in to the secure registry on port 5000:
podman login localhost:5000Under
usernameandpassword, enter your credentials.
📝Pull a Custom Image to the System
Find the
llama-webimage:podman search llama-webFind the tags associated with
llama-webimage onlocalhost:5000(The localhost registry and image were previously created and configured for demo purposes. You can use this link to explain how to create and configure):skopeo inspect docker://<IMAGE_NAME> | less
📌Note: Skopeo is a tool for manipulating, inspecting, signing, and transferring container images and image repositories on Linux® systems.
Press Escape followed by
:qto exit.Use the
v1.1tag to pull the image:podman pull <IMAGE_NAME>:v1.1Clear your screen:
clearView the pulled image:
podman images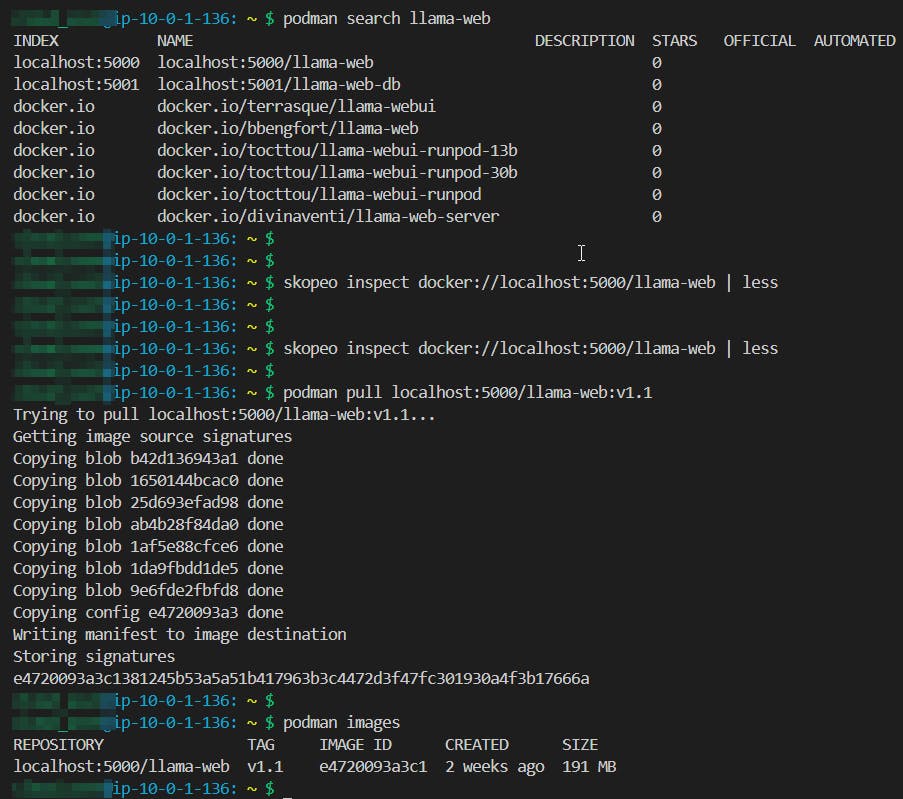
📝Modify the Existing Containers Default Web Page
Verify the container is running:
podman ps -aCheck the default web page:
curl localhost:8080Connect to the container:
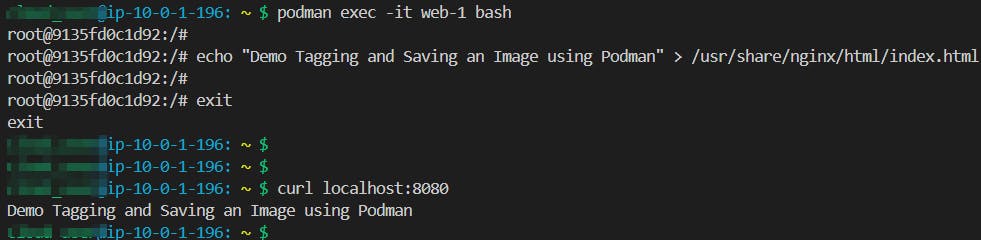
podman exec -it web-1 bashChange the default web page:
echo "Demo Tagging and Saving an Image using Podman" > /usr/share/nginx/html/index.htmlExit out of the container:
exitVerify the change was successful:
curl localhost:8080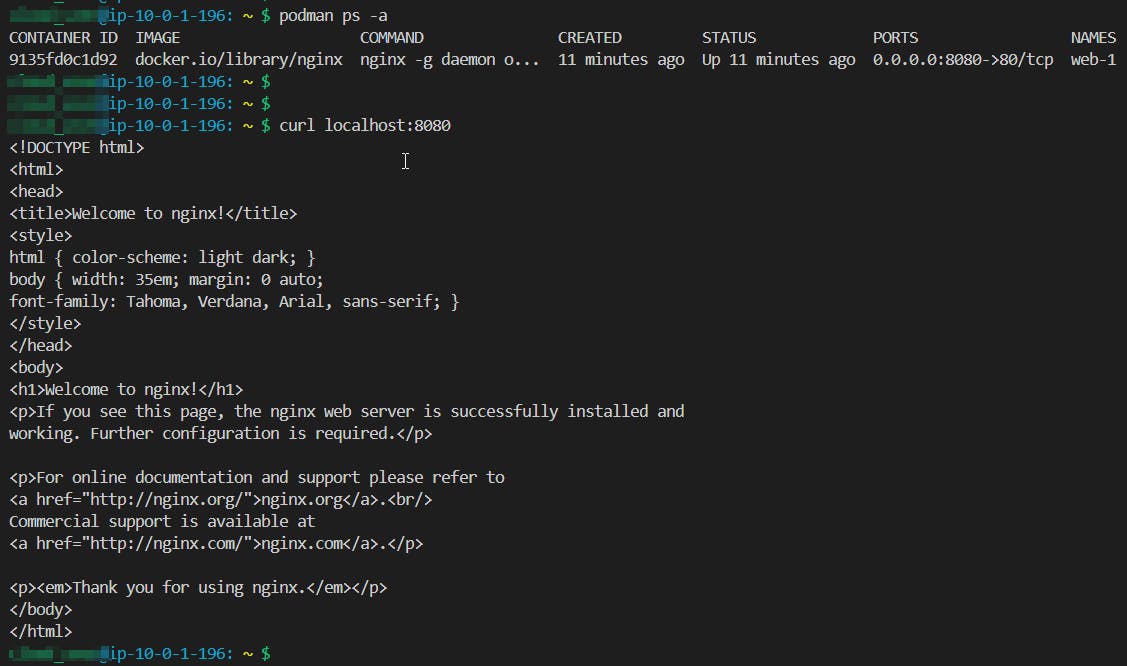
📝Commit the Changes to a New Image and Tag the Image
Commit the changes to a new image:
podman commit web-1 localhost:5000/llama-rama-webVerify the changes have been committed:
podman imagesClear your screen:
clearView the image list:
podman imagesTag the new image as
v1.0:podman tag <IMAGE_NAME> <IMAGE_NAME>:v1.0View the image list to verify the tag:
podman imagesclearyour screen.
📝Create a .tar Archive of the New Image
View the image list:
podman imagesCreate a .tar archive of the new image named
llama-rama-web.tar:podman save -o llama-rama-web.tar localhost:5000/llama-rama-web:v1.0Confirm the .tar file exists:
ls -l llama-rama-web.tarclearyour screen.
📝Publish the New Image to a Local Registry
Log in to the registry:
podman login localhost:5000Use your credentials for the
UsernameandPassword.View the image list:
podman imagesPush the
llama-rama-webimage with thev1.0tag to the local registry:podman push <IMAGE_NAME>:v1.0 <IMAGE_NAME>:v1.0clearyour screen.Verify the image was successfully pushed:
podman search llama-rama-web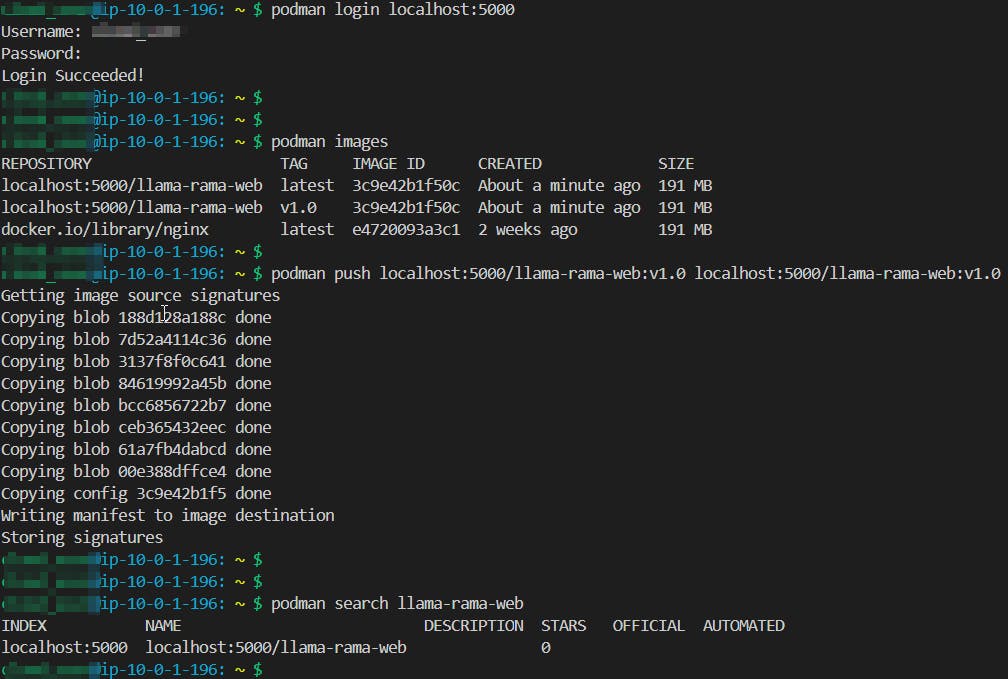

📌Note - At the end of each hands-on Lab, always clean up all previous resources created to avoid being charged if you used a Cloud Provider to provision them.
Congratulations — you have completed this hands-on lab covering the basics of Working with Image Registries, Tagging and Saving an Image using Podman.
Thank you for reading. I hope you understood and learned something helpful from my blog.
Please follow me on CloudDevOpsToLearn and LinkedIn, franciscojblsouza