


Table of contents


No headings in the article.
Microservices or containers are used to execute modern cloud-native apps.
Microservices must communicate dynamically in these contexts, with no manual configuration.
This is made possible by Service Discovery.
▶What is Service Discovery?
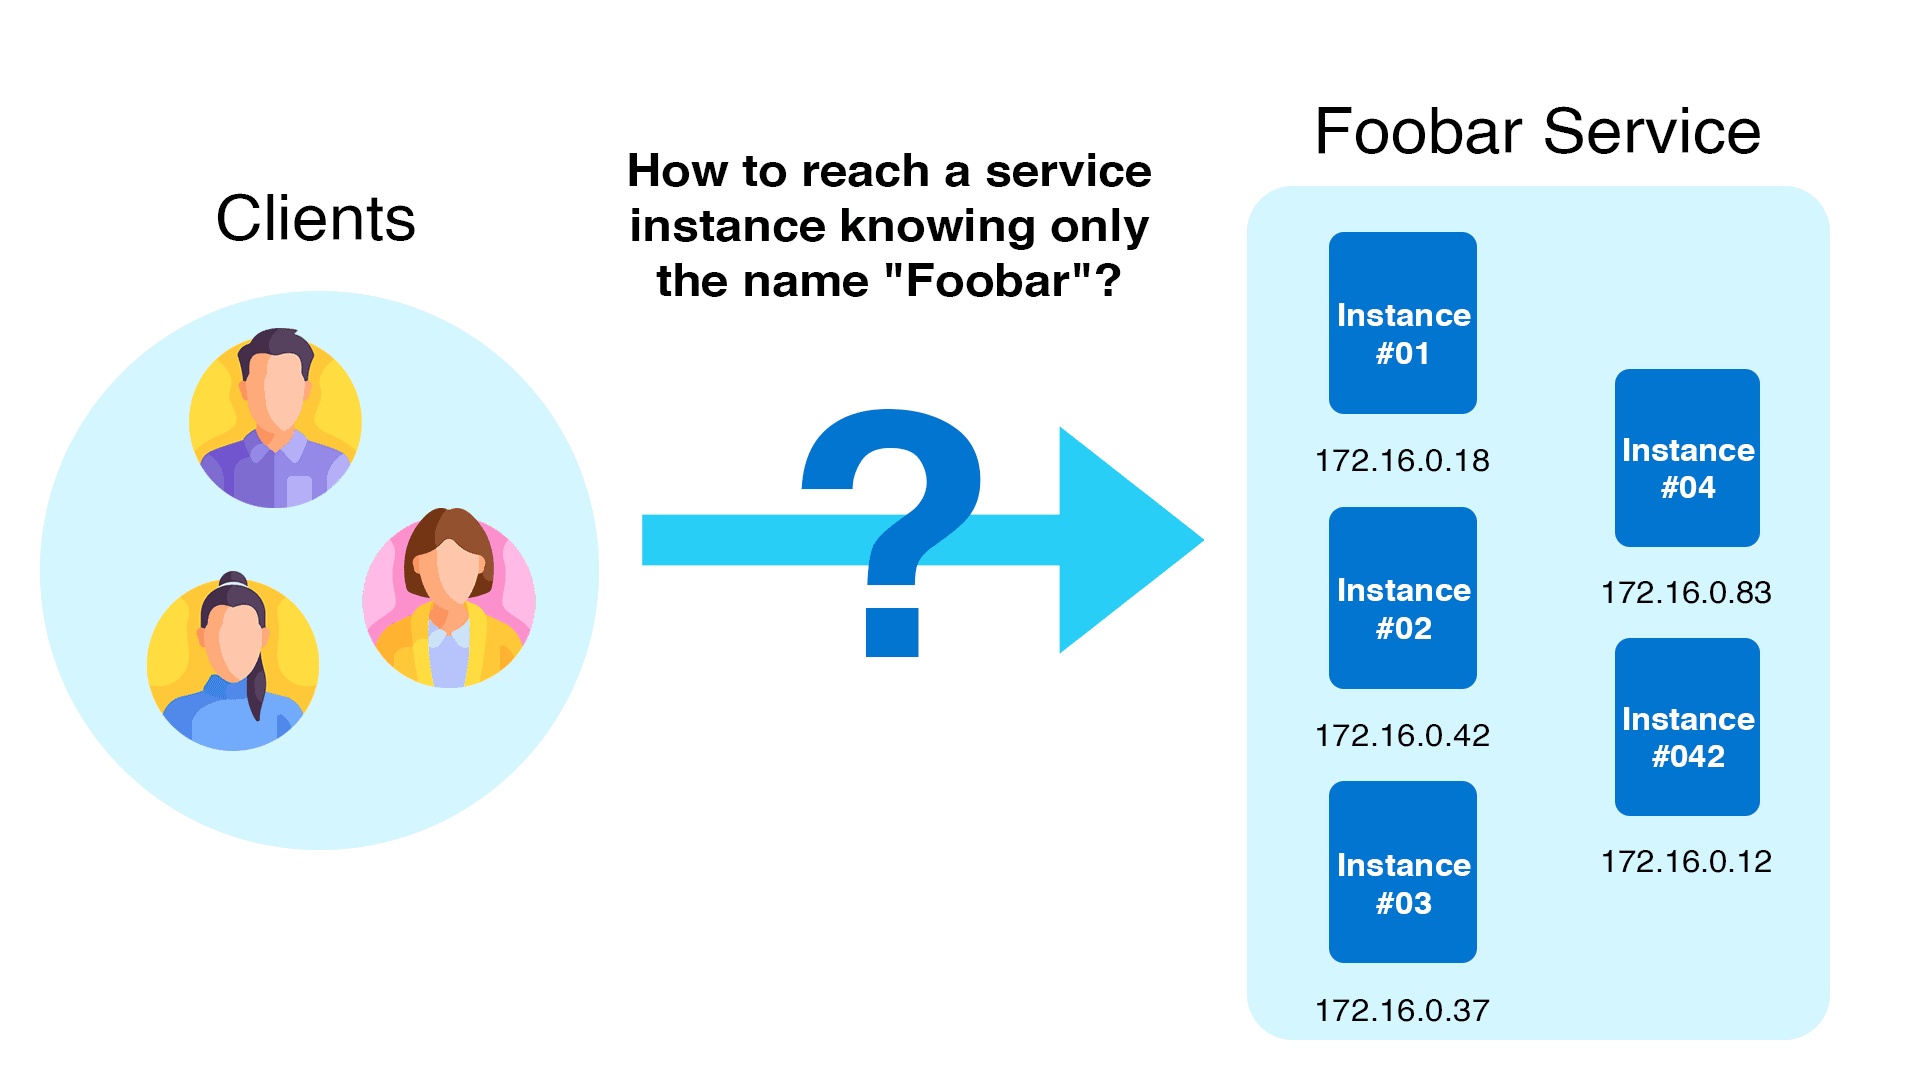
Service discovery is a method that allows services to discover one another in real time without the need for hard coding IP addresses or endpoint setups.
Microservices are used to create applications with modern cloud-native infrastructure such as Kubernetes. For applications to work, the many components inside a microservices architecture must connect, but individual IP addresses and endpoints vary dynamically.
As a result, Service Discovery is required so that services may automatically discover each other.
There are numerous types of service discovery. Let's take a look at the common uses:
\>> Server-side service discovery
Server-side service discovery involves putting a load balancer (LB) in front of the service and letting the load balancer connect to service instances.
This process eliminates client-side complexity. The client simply points to the IP or DNS name of the load balance.

\>> Service registry
Another approach to Service Discovery is to remove the LB component and implement service discovery on the client-side using a centralized Service Registry.
The Service Registry contains information about service endpoints where clients can send requests.
The main advantage of a service registry compared to a server-side approach is that there is one less component to manage (no LB) and no bottleneck.
\>> Kubernetes Service Discovery
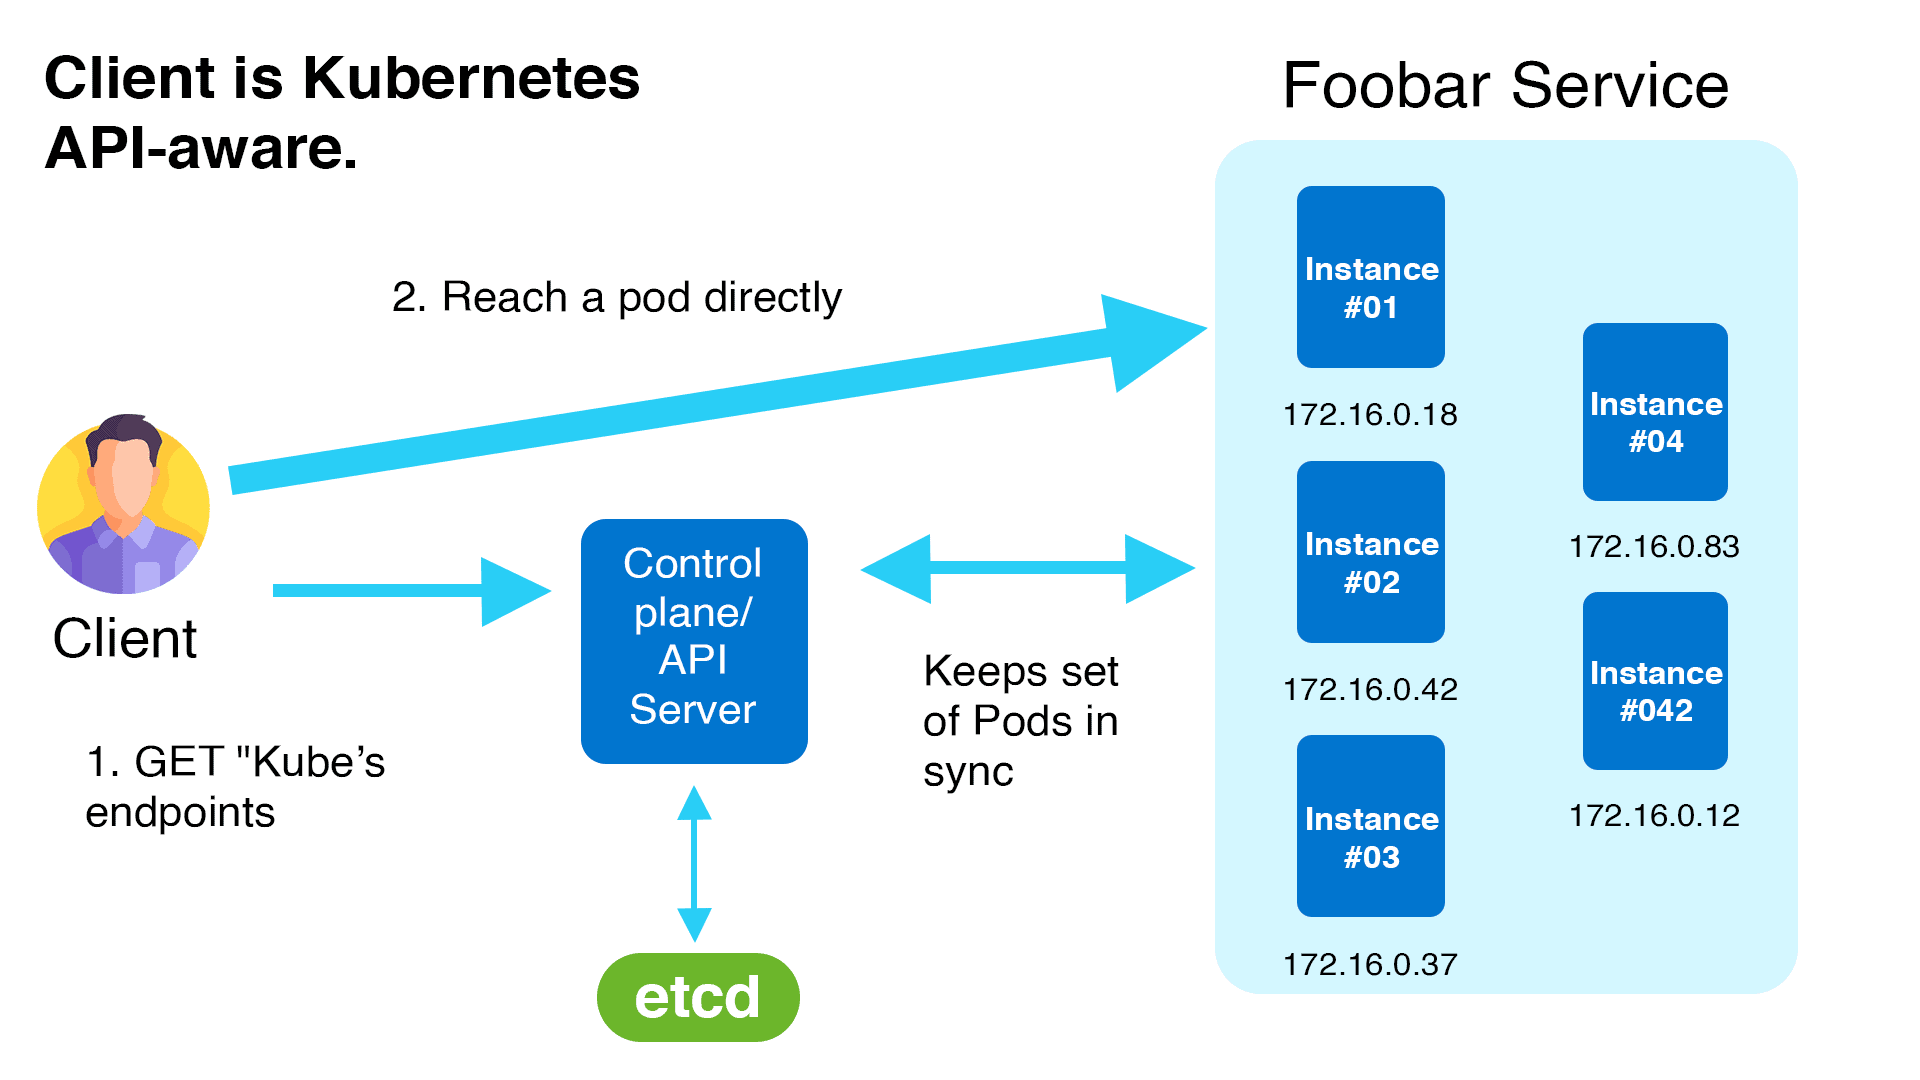
One way Kubernetes provides service discovery is through its endpoints API. With the endpoints API, client software can discover the IP and ports of pods in an application.
\>> Kubernetes service discovery using service objects and kube-proxy
Kubernetes provides service discovery in other ways in case the client doesn't use the API directly.
Because pods can come and leave dynamically in Kubernetes, a service object ensures that the endpoint or IP address that points to the list of operating pods never changes. If numerous pods are operating in the same application, the requests are also load-balanced across a group of pods.
Clients can utilize the Kubernetes service’s DNS name. Kubernetes’ internal DNS manages service mapping.
The fundamental implementation of Kubernetes Service is handled by a kube-proxy instance running on each worker node.

\>> Let’s get hands-on with Kubernetes Service Discovery.
We’ll walk through an example application deployment and see that Kubernetes DNS maps the service names automatically. We’ll also see that the environment variables related to service discovery are auto-injected into the pods.
This gives the application developer a choice of using the Kubernetes DNS names to connect to other services or using environment variables.
To get started, create a test namespace for this demo:
$ kubectl create ns demo
namespace/demo created
Next, create an nginx app deployment:
$ kubectl -n demo apply -f
https://k8s.io/examples/application/deployment-update.yaml
deployment.apps/nginx-deployment created
Next, see if the pods are up and running and confirm if the endpoints are available.
You will notice that the endpoints are not available. This is because we have not created a service object yet.
$ kubectl -n demo get pods
NAME                                READY   STATUS    RESTARTS   AGE
nginx-deployment-559d658b74-k79zt   1/1     Running   0          45s
nginx-deployment-559d658b74-xjpvb   1/1     Running   0          45s

## check if the pods endpoints are available in Kubernetes ( not yet )
$ kubectl -n demo get ep
No resources found in demo namespace.
Create a service object for the deployment using the kubectl expose command.
$ kubectl -n demo expose deployment/nginx-deployment
service/nginx-deployment exposed

$ kubectl -n demo get svc
NAME               TYPE        CLUSTER-IP       EXTERNAL-IP   PORT(S)   AGE
nginx-deployment   ClusterIP   10.245.202.247   ‹none›        80/TCP    13s
Now, check the endpoints and see if they report pod IP/port addresses. Note there are two addresses because we are running two replica pods for the deployment.
$ kubectl -n demo get endpoints
NAME               ENDPOINTS                         AGE
nginx-deployment   10.244.2.152:80,10.244.2.203:80   24s
You can see the service definition created by the expose command using this command:
$ kubectl -n demo get svc nginx-deployment -o yaml

- apiVersion: v1
  kind: Service
  metadata:
    name: nginx-deployment
    namespace: demo
    resourceVersion: "31628410"
    uid: 45a58559-d9e3-43a6-bfbc-e3ab6bb4aff0
  spec:
    clusterIP: 10.245.202.247
    clusterIPs:
    - 10.245.202.247
    ports:
    - port: 80
      protocol: TCP
      targetPort: 80
    selector:
      app: nginx
    sessionAffinity: None
    type: ClusterIP
  status:
    loadBalancer: {}
Note the IP address of the service. It is auto-mapped by DNS. Additionally, as we can see below, env vars are automatically injected into the service name by Kubernetes for service discovery.
$ kubectl -n demo get svc
NAME               TYPE        CLUSTER-IP       EXTERNAL-IP   PORT(S)   AGE
nginx-deployment   ClusterIP   10.245.202.247   ‹none›        80/TCP    82s
Now, let’s create a client pod to connect to the application deployment. We will test service discovery by doing nslookup on the service name and see the auto-created environment variables related to service discovery.
$ kubectl -n demo run tmp-shell --rm -i --tty --image nicolaka/netshoot --
/bin/bash
Let’s do a name lookup for the nginx service if we can find it (and yes we do):
bash-5.1# nslookup nginx-deployment
Server:10.245.0.10
Address:10.245.0.10#53

Name:nginx-deployment.demo.svc.cluster.local  ( auto mapped to FQDN )
Address: 10.245.202.247 ( IP of the service )
Access the app/service by Service name:
bash-5.1# curl nginx-deployment
‹!DOCTYPE html›
‹html›
‹head›
‹title›Welcome to nginx!‹/title›
‹style›
    body {
        width: 35em;
        margin: 0 auto;
        font-family: Tahoma, Verdana, Arial, sans-serif;
    }
‹/style›
‹/head›
‹body›
‹h1›Welcome to nginx!‹/h1›
‹p›If you see this page, the nginx web server is successfully installed and
working. Further configuration is required.‹/p›

‹p›For online documentation and support please refer to
‹a href="http://nginx.org/"›nginx.org‹/a›.‹br/›
Commercial support is available at
‹a href="http://nginx.com/"›nginx.com‹/a›.‹/p›

‹p›‹em›Thank you for using nginx.‹/em›‹/p›
‹/body›
‹/html›
bash-5.1#
Check the pod environment variables related to service discovery
bash-5.1# env
KUBERNETES_SERVICE_PORT_HTTPS=443
KUBERNETES_SERVICE_PORT=443
NGINX_DEPLOYMENT_PORT_80_TCP_PROTO=tcp
HOSTNAME=netshoot
NGINX_DEPLOYMENT_PORT_80_TCP=tcp://10.245.202.247:80
PWD=/root
HOME=/root
KUBERNETES_PORT_443_TCP=tcp://10.245.0.1:443
NGINX_DEPLOYMENT_PORT_80_TCP_ADDR=10.245.202.247
NGINX_DEPLOYMENT_SERVICE_PORT=80
NGINX_DEPLOYMENT_PORT_80_TCP_PORT=80
NGINX_DEPLOYMENT_SERVICE_HOST=10.245.202.247
TERM=xterm
SHLVL=1
KUBERNETES_PORT_443_TCP_PROTO=tcp
KUBERNETES_PORT_443_TCP_ADDR=10.245.0.1
NGINX_DEPLOYMENT_PORT=tcp://10.245.202.247:80
KUBERNETES_SERVICE_HOST=10.245.0.1
KUBERNETES_PORT=tcp://10.245.0.1:443
KUBERNETES_PORT_443_TCP_PORT=443
PATH=/usr/local/sbin:/usr/local/bin:/usr/sbin:/usr/bin:/sbin:/bin
_=/usr/bin/env
The output above shows that the DNS auto-created the mapping of the service name to the IP address for the service that the client pod can use to access the nginx. The successful curl command demonstrates the mapping works.
Additionally, we saw that the pod environment is auto-populated by the variables related to service discovery. The client pod can use these variables to connect to the nginx service.
Finally, now that we’re done, clean up the namespace.
$ kubectl delete ns demo --cascade
namespace "demo" deleted
This was a nutshell of Kubernetes Service Discovery.