

Jenkins Pipeline Project for DevOps Engineers - Part 2
#90DaysofDevOps Challenge - Day 25/26/27


In this tutorial, we will cover some topics of Jenkins like creating Pipelines, using GitHub Webhooks, Docker, and deploying apps using automated workflows for development and production purposes.
▶Task 1 - Integrating GitHub Webhooks with Jenkins to automate unit and integration tests after GitHub events for CI/CD
- Log in on your Jenkins server

- Create a Jenkins API Token
To connect Webhook to the Jenkins server, first, create an API Token to authenticate from the version control provider (Github in this case). You need to click on your account and then on the configure option.

Then click on Add new Token, named it and then press Generate.
P.S. - Please, store this Token in a safe place because there is no way to recover it in the future unless creating a new one.
- Configuring Github repository
For hands-on tests, you can use this GitHub repo as an example. Please, Fork it.
There is a NodeJS app available.
- Creating the GitHub Webhook
To create our GitHub Webhook, open the repository and click on settings

Then click on Webhooks and Add Webhook

Inside the Payload URL text box, add the IP of your Jenkins Server, plus: /github-webhook/.
e.g. http://13.38.39.167:8080/github-webhook/
Inside the Secret box, paste the Jenkins API Token created on Create a Jenkins API Token above. Finally, click on Just the push event for your needs to trigger Jenkins.

Once the Webhook is created, it will look like the following image.

GitHub restricts API to use a username and password, then you must create a GitHub Token for it.
To create a token to be authenticated from Jenkins, you must go to your GitHub profile, then click on Settings, Developer Settings, Personal access tokens (or go to this official link). Once there, click on Generate new token and store it in a safe place for future uses.
- Configuring Jenkins
So far we have, a Jenkins server running on an AWS EC2 instance, and created a Jenkins API Token to authenticate on the GitHub webhook. You have a Jenkinsfile from the GitHub Fork repo. Now, this is the step to add GitHub credentials to Jenkins and create a pipeline to run the Jenkinsfile tests for the remote repo.

Scroll down to the GitHub section (check if you have the GitHub plugin installed on Jenkins; if you installed all the recommended plugins at Jenkins installation, it should be there) and click on Add GitHub Server, GitHub Server.
Inside the credentials section click on add, Jenkins. A new window will be displayed. Select, Secret text adding the GitHub API token create previously.
Give some ID and Description by clicking on ADD

- Creating a Jenkins Pipeline
To create a Jenkins Pipeline to test the Webhook, go to the Dashboard, new item, give it a name and click on the Pipeline job.
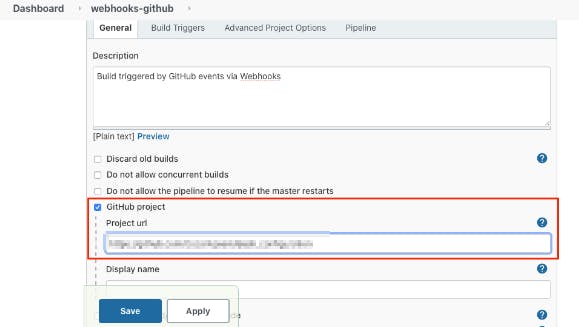
In the General Tab add a description for this Pipeline, check the option: GitHub project, and inside the Project Url text box, add the URL for the remote repository to be tested.
In the Build Triggers tab, check the box: GitHub hook trigger for GITScm polling. This option will enable this build to run after the Webhook sends the POST request.
In the Pipeline tab, choose Pipeline script from SCM option to execute the steps declared in the Jenkinsfile for the project, select Git and paste your repository URL.
Then add the credentials. This step is not required but will enable GitHub to set a mark if the test passed or failed.


Finally, choose the branch to build the Pipeline and the path for the Jenkinsfile.
Click on save.

- Pushing a commit to GitHub repository and triggering the build
This process's main idea is to automate a Jenkins Pipeline to run testing validations after some changes have been made in a remote repository.
Before committing a new change in the GitHub repository, run manually at least one time the Jenkins job to be triggered by the Webhook.

After the first run, let's check what Jenkins Pipelines deployed for us.


A NodeJS app is deployed and running.

Now, let's go to the GitHub repository and create a new commit.
In this example, we committed this entry:

Jenkins Pipelines will start automatically a new workflow


Here, we have the new output.

We can go to the GitHub repository and check all the Webhook requests received by Jenkins Pipelines.

Also, we can check our Commit on the GitHub repository.

If you have read this far, we specified any desired GitHub events according to our needs to trigger a Webhook that will automatically start a Jenkins Pipelines build to test new changes in your remote repository for your CI/CD workflow.
▶Task 2 - Jenkins Pipeline vs. Multibranch Pipeline
Jenkins pipeline allows you to have a flexible Jenkinsfile with stages for your build. So you can have an initial stage where you run linting, tests, etc., and then separate stages for building artefacts or deploying them. This is very useful when you want to do multiple things in your Pipeline.
Multibranch Pipeline allows you to split tasks out into branches and merge them together later. This is very similar to the way Git branching works.
A Multibranch Pipeline is a Pipeline that has multiple branches. The main advantage of using a Multibranch Pipeline is to build and deploy multiple branches from a single repository. Having a multibranch pipeline also allows you to have different environments for different branches.
P.S. - However, it is not recommended to use a Multibranch Pipeline if you do not have a standard branching and CI/CD strategy.
Now, since you already know the comparison of the Jenkins pipeline vs. Multibranch Pipeline, let’s go through the steps to create a Jenkins Multibranch Pipeline.
- Log in on your Jenkins server
Open Jenkins home page & click on New Item from the left side menu


- Create Jenkins Multibranch Pipelines
Enter Jenkins job name & choose the style as Multibranch Pipeline and click OK.

On the Configure page, you can add some Display Name and Description, and configure the Git Repo source.
Scroll down to the Branch Sources section & click on Add Source dropdown.
Choose GitHub as Source as our Sample GitHub repo is hosted there.

Enter the Repository HTTPS URL as https://github.com/fjblsouza/techworld-js-docker-demo-app.git and click on Validate.
Since this GitHub repo is hosted as a public repo, we don’t need to configure credentials to access it. For enterprise/private repos, we may need credentials to access them.

Once you click on Save, Jenkins will perform the following steps automatically.
Scan Repository Step
Scan the Git repo we configured
Look for the list of branches available in the Git repo
Select branches which have Jenkinsfile
Running Build Step
- Run build for each of the branches found in the previous step with steps mentioned in Jenkinsfile
From the Scan Repository Log section, we can understand what happened during the Scan Repository step

In this case, we have master and dev branches in the Git repo, Scan Repository Log says 2 branches were processed
After the scan is complete, Jenkins will create & run a build job for each processed branch separately.
We can check by clicking on Status in the left-side menu.


This was a nutshell explanation of how to create Freestyle and Multibranch Pipelines.
I hope it is useful to all of you.